2022/12/15 Update: with IRKit cloud officially shutting down this firmware can avoid your device turning into a brick.
More discussion on this GitHub thread.
IRKit is a device really fun to play with.
After writing a custom initialization guide and a web solution to control the device, I decided to dig into the IRKit firmware.
There were still 2 points bugging me with the official firmware:
- The LED is always on. It acts like a feedback, to show the user the device is working well. It’s all great and fine unless, like me, you can’t stand yet-one-more-LED lighting-up the dark room at night. I sleep much better in total darkness.
- IRKit needs Internet access. During the setup phase, IRKit needs Internet access to validate the device key (used by the cloud control). Also the firmware polls the cloud servers every 25 seconds to check if there are some IR commands to send. I don’t need the cloud feature, I use IRKit Web Remote instead. I wanted a LAN-only mode for IRKit, it is much more secure than granting the device WAN access.
So here is my modified firmware which allows you to customize these 2 points.
The rest of this post explains how to retrieve the code, recompile the firmware and deploy it to your IRKit.
Retrieving the code
First let’s get the code from GitHub. You can clone the repository:
git clone https://github.com/acourreges/device.git
or alternatively simply download the zip archive.
Customize to your taste
Navigate to device/firmware/src/IRKit and rename the file version.template to version.c.
Open the file config.h, this is where you can configure the settings:
1 2 3 4 5 6 7 8 9 10 11 12 13 14 15 16 | |
To modify the LED behavior simply modify the line const LedFeedbackProfile ledFeedback = LED_QUIET; and replace LED_QUIET by either LED_VERBOSE, LED_SETUP_ONLY or LED_OFF.
If you want to enable the offline mode, then set useCloudControl to false.
Update: IRKit cloud service being shut down, you absolutely must set this to false otherwise IRKit will fail initializing.
Set up the Arduino environment
You should install the “Arduino IDE” for your OS, the 1.0.6 version is highly recommended and can be found here.
If you absolutely need to use a newer IDE version, the firmware described on this page might not compile out-of-the-box. It is fortunately relatively easy to update the codebase to compile with 2.x IDEs like described on this GitHub thread.
I’m going to give some more details concerning the setup with Windows because I encountered a few problems.
First install Arduino IDE 1.0.6, it should install the drivers for the Arduino boards also.
Then connect your IRKit to a USB port of your computer.
Let’s check if the board is recognized correctly. Open the device manager (‘Computer’, right-click, ‘Properties’, ‘Device Manager’), if the board was recognized it should appear on a COM port, in my case COM7:
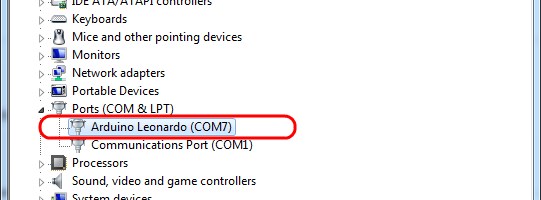
If you see your device then congratulations, you can skip the following and go directly to the next step.
But chances are, your device was not recognized and just appears as a yellow question mark in the list.
No worry, we will just be more explicit and tell Windows which driver we want to use.
Still inside the Device Manager, right-click on your unrecognized device, ‘Properties’, ‘Details’ tab and in the drop-down menu select ‘Hardware Ids’.
It should display something like this:
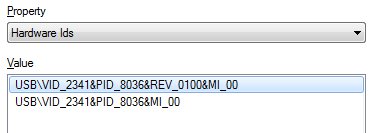
Note down the values, we’re going to need them later.
Then navigate to C:\Program Files (x86)\Arduino\drivers and extract the archive Old_Arduino_Drivers.zip.
Edit the file Arduino Leonardo.inf and modify the Vendor and Product ID Definitions section to add the IDs you got previously from the Device Manager:
1 2 3 4 5 6 7 8 9 10 11 12 13 14 15 | |
Save the file, go back to the Device Manager, then right-click, ‘Properties’, ‘Driver’ tab.
Click on ‘Update Driver…’ and ‘Browse my computer for driver software’. For the folder simply provide C:\Program Files (x86)\Arduino\drivers\old_drivers and let Windows install the device.
Windows should now associate the Leonardo driver with your board. Your device should appear as a COM device.
Since we’re still in the ‘Device Manager’ let’s fix one more issue you might run into.
When trying to upload the new firmware to IRKit I got the following error:
avrdude: error: buffered memory access not supported. Maybe it isn't a butterfly/AVR109 but a AVR910 device?
To prevent this problem, right-click on your device, ‘Properties’, ‘Port Settings’ tab, ‘Advanced…’:
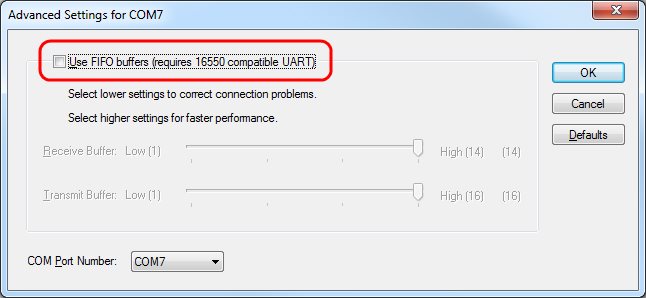
Make sure the Use FIFO buffers checkbox is not selected.
Compile and upload the firmware
Go back to the folder with the source code of the firmware (where you edited config.h).
Double-click on IRKit.ino, this will launch Arduino and load the project.
Make sure the correct COM port is selected:
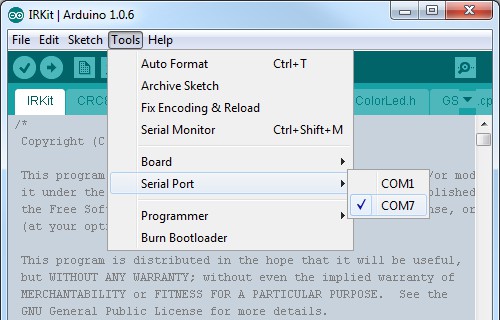
Then simply click on ‘File’, ‘Upload’: this will compile the firmware and upload the binary to the board.
And that’s it! No more bright LED. :)
Note that in some case, flashing the firmware can cause a reset of the EEPROM, meaning the board might forget the credentials to join your home WiFi network so you might have to go through the setup phase again.
An important point: after flashing this custom firmware, the device in setup-mode will always broadcast a WiFi network which password is now XXXXXXXXXX, so don’t try to use the old password you found on the small piece of paper inside the IRKit box.