Adrian
Courrèges

MiniCopier Released

On Windows I was a heavy user of SuperCopier: a graphical copy manager to queue transfers, limit the speed…
However on Linux, I was disappointed I could not find anything equivalent.

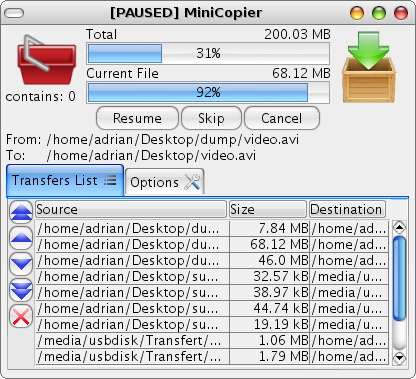
So I got my hands dirty and wrote this small utility program:

MiniCopier

MiniCopier

Go ahead and give it a try!
It’s multiplatform Linux/MacOS/Windows.
Don’t hesitate to email me your feedback.

“The type java.lang.Object cannot be resolved.” with Eclipse

The type java.lang.Object cannot be resolved. It is indirectly referenced from required .class files

This is the nice error message I got from Eclipse after the CVS checkout of a project. This error is kind of annoying because Object is the base of almost all Java entities, without it it’s impossible to create any Java class.
It took me a while before figuring out it was actually a bug with Eclipse. Here is how to get rid of it.

Eclipse bug

During a project creation, Eclipse generates a .classpath file within the project directory. In my case this file looked like this:

.classpath (incorrect)
1
2
3
4
5
6
7
<?xml version="1.0" encoding="UTF-8"?>
<classpath>
    <classpathentry kind="src" path=""/>
    <classpathentry kind="con" path="org.eclipse.jdt.launching.JRE_CONTAINER/
    org.eclipse.jdt.internal.debug.ui.launcher.StandardVMType/java5">
    <classpathentry kind="output" path="">
</classpath>

The fifth line is the problem: it contains data which has nothing to do here. It has been mistakenly added by Eclipse.
It is just necessary to remove: org.eclipse.jdt.internal.debug.ui.launcher.StandardVMType/java5

This is the correct content:

.classpath (correct)
1
2
3
4
5
6
<?xml version="1.0" encoding="UTF-8"?>
<classpath>
    <classpathentry kind="src" path="">
    <classpathentry kind="con" path="org.eclipse.jdt.launching.JRE_CONTAINER">
    <classpathentry kind="output" path="">
</classpath>

This solved the issue in my case. :)

I’m not sure if the bug is linked to the version of Eclipse (3.1).
At first I had some suspicions about the JVM used by Eclipse.
Many Linux distributions come with GCJ as the default JVM, usually I force the use of the Sun JRE 1.5 with the command:

$ /usr/bin/eclipse -vm /usr/lib/jvm/java-1.5.0-sun/bin/java

Edit: actually the problem only appears if you specify a custom version of the JVM to use during the project creation. To avoid the bug you can create the project and only after the creation you affect a particular version for the JVM within the project options.

IP Range Filter with Apache or Tomcat

Sometimes it can be useful to restrict access to a server depending on the IP address of the client. When you’re developing an application and you wish to run some tests over the internet you don’t want everybody to have access to the documents or services you expose to the network.

Here is a way to allow access only from a certain range of IP addresses. For the following let’s assume that you want to allow only 12.34.56.78 and LAN adresses 192.168.1.* to access the server

For ApacheApache logo

If you want to protect the documents of a directory, a simple .htaccess file is enough. You just need to create a file named “.htaccess” in the directory you want to protect, with the following content:

.htaccess
1
2
3
4
Order Deny,Allow
Deny from all
Allow from 12.34.56.78
Allow from 192.168.1.0/24

For TomcatTomcat logo

Tomcat does not understand .htaccess files.
In my case I wanted to restrict the access to the entire webserver. This can be done by modifying the context configuration.

Edit the file context.xml located in the conf directory of your Tomcat installation. You just need to add a valve within <Context>.

context.xml
1
2
3
4
5
6
7
8
<Context>

    [...]

    <Valve className="org.apache.catalina.valves.RemoteAddrValve"
            allow="12\.34\.56\.78,192\.168\..*" />

</Context>

Note that the syntax is quite different from the one you would expect especially for regular expressions.
Tomcat should now reply with a 403 forbidden answer to unauthorized clients.

Don’t forget to restart Tomcat for the changes to take effect.

Ubuntu Dapper, WPA and static IP

If you want to use WPA encryption for your wireless network and connect to it using Ubuntu, there is no particular problem and Network-Manager can be really helpful. No problem… as long as your network is configured to use DHCP! Network-Manager cannot handle (yet?) static IP, and the default networking tool in Dapper just does not understand WPA.

Fortunately WPA-Supplicant can solve this issue. :)

The Network-Manager documentation on Ubuntu website is kind of messy and is likely to repel any beginner. However the configuration is really quick to do and this tutorial should help you set up your connection in less than 2 minutes.

From now on I consider your wireless card is recognized by the system and that you are able to get a wireless connection on a open or WEP-encrypted network.
I am using the following devices: a laptop running Dapper with an Intel IPW2200 wireless card and a WRT54G router.

During the tweaking only 2 configuration files are going to be modified:
/etc/network/interfaces
/etc/wpa_supplicant/wpa_supplicant.conf
But only one will have to be edited manually.

Installation

By default WPA-Supplicant is already installed in Dapper. If you don’t have it you can install it by:

$ sudo apt-get install wpasupplicant

(Universe repositories must be enabled.)

Configuration

Open the default networking tool of Ubuntu (with Gnome: System –> Administration –> Network).
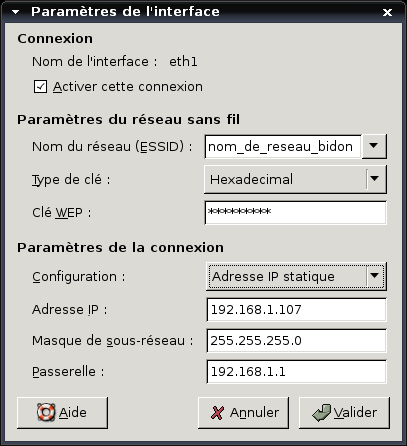
Network tool


Input an SSID and a fake WEP key, and input correct data for all the other fields (static IP, Mask, Gateway address).

Remember also the name of your network interface (here “eth1”) this will be useful for the connection. Apply the settings and close the window.

The file `/etc/network/interfaces` should have been automatically edited. You can check with this command:

$ more /etc/network/interfaces

There should be a section looking like this:

iface eth1 inet static
wireless-essid some_network_name 
wireless-key some_fake_key 
address 192.168.1.107 
netmask 255.255.255.0 
gateway 192.168.1.1

Now we have to edit the WPA-Supplicant configuration file.

$ sudo gedit /etc/wpa_supplicant/wpa_supplicant.conf

Replace its content by:

ctrl_interface=/var/run/wpa_supplicant
eapol_version=1
ap_scan=1
fast_reauth=1

network={ 
    ssid="my_wpa_network_ssid"
    proto=WPA RSN
    key_mgmt=WPA-PSK 
    psk="my_secret_wpa_key" 
} 

With of course the name of your network and the WPA key in clear text.

Connexion

To enable the connection, type the following command:

$ sudo wpa_supplicant -w -D wext -i eth1 -c /etc/wpa_supplicant/wpa_supplicant.conf

(It might be necessary to adapt “eth1” to your interface.)
If you get something like this:

Trying to associate with 00:13:10:**:**:** (SSID='My Network' freq=0 MHz) 
Associated with 00:13:10:**:**:** 
WPA: Key negotiation completed with 00:13:10:**:**:** [PTK=TKIP GTK=TKIP] 
CTRL-EVENT-CONNECTED - Connection to 00:13:10:**:**:** completed (auth)

Then you should be done, congratulations! You can try to ping the router as a test (and probably add the addresses of some DNS servers if the name resolution fails).

So here I tried to present a simple and quick method to connect to a WPA network using static IP. It worked really great but I cannot guarantee it will also be fine for you. I would like to remind that all the tweaking has been done with Dapper, the more recent versions like Feisty already have Network-Manager installed by default as well as Avahi-Daemon that might interfere with WPA-Supplicant. (You can try to disable them if you encounter any problem.)

This method is useful if you really need static IP mode with old routers. Nowadays most of the routers are able to provide a static IP to an host in DHCP mode (the host is recognized based on its MAC address).
Website Online

Welcome to my personal homepage!

I plan to put here some projects I have been working on during my free time.
Also I will leave some technical notes like tutorial or configuration process: I figured out that instead of keeping them in some local text files I could lose, I might as well put them online where I can easily find them later. And who knows, they might actually prove useful to somebody else also…