Post-effects are performed once the scene has been rendered, to enhance, fix artifacts, change the mood…
We saw in Part 1 how a few post-effects were applied, like bloom,
anti-aliasing or tone-mapping.
But there are several other effects used in GTA V.
Lens Flares & Light Streaks
When the light goes through a real-world lens, the scattering and internal reflections sometimes cause artifacts.
What I call “lens flares” here is a collection of bright spots along the axis defined by a bright light source and the center of the screen.
There are also “light streaks” which are rays originating from the light source. These artifacts are very common in movies, when they are added
to a game frame they can give a kind of “cinematic” feeling.
Lens Flares & Light Streaks
There are usually 2 ways to render such artifacts:
image-based: extracting the brightest areas, duplicating and deforming them. Works for any number of bright light sources.
sprite-based: adding textured-sprites and managing their positions manually. Each light source must be handled separately but artists can have more
control over the artifact shape, color, intensity…
GTA V actually uses both techniques: the image-based approach is used to add a subtle blue halo at the bottom-left corner of the image, it’s actually a symmetric of
the bright-pass buffer.
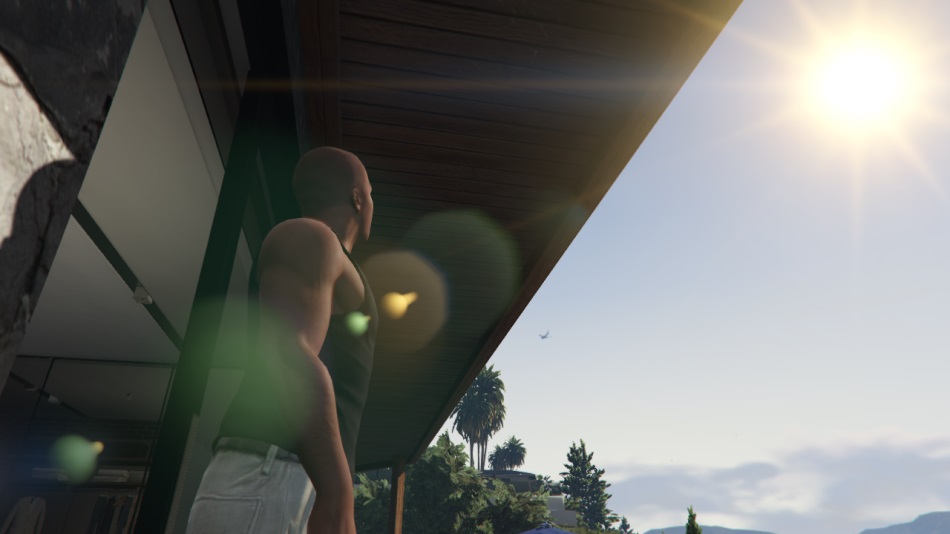
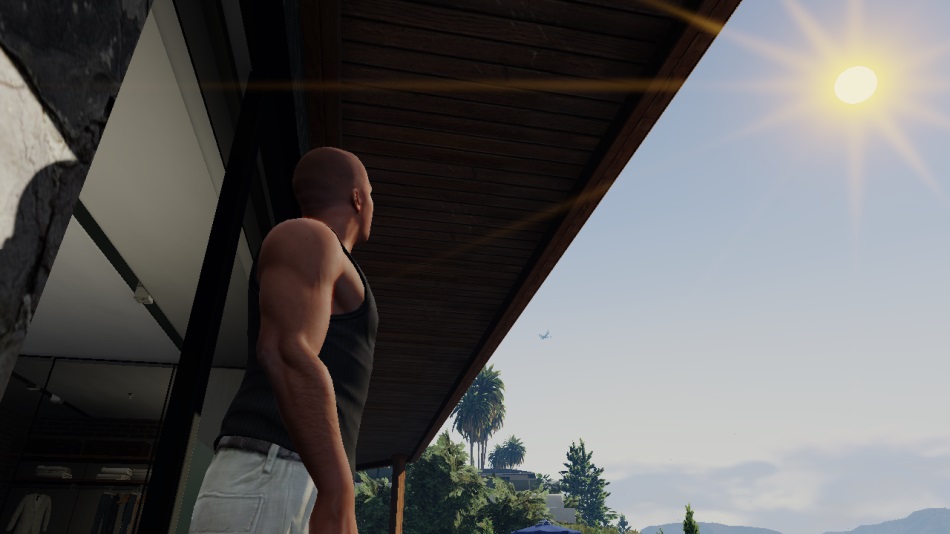
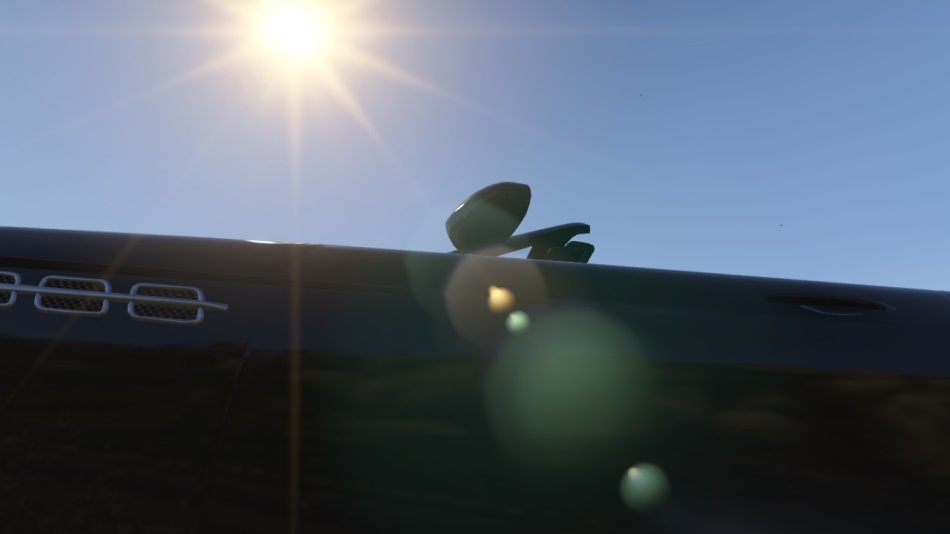
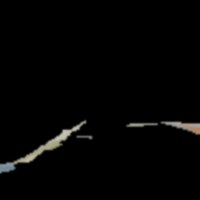
But the most visible artifacts in this scene result from the sprite-based approach, it is applied for the sun only. First, light streaks are added by rendering 12 rotated quads centered around the sun.
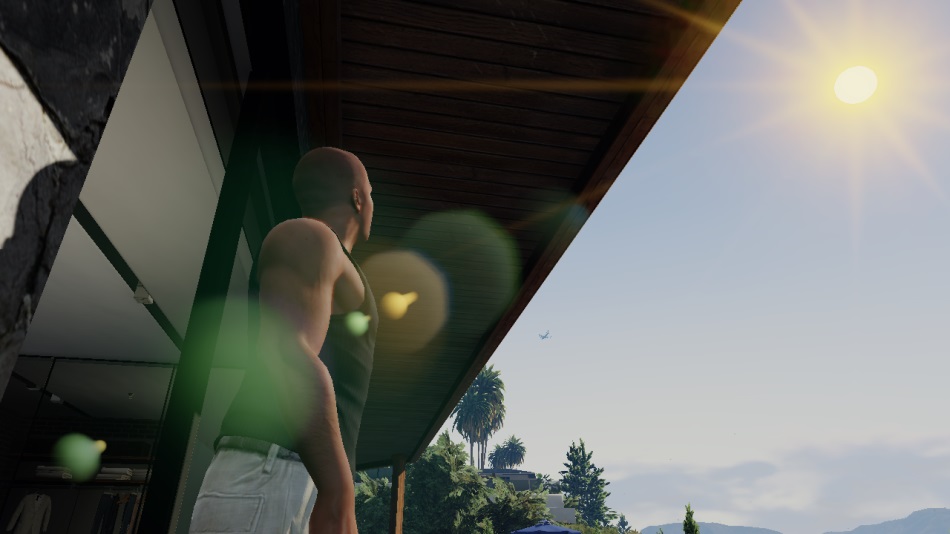
Then for the lens flares, 70 sprites are drawn along the axis “sun – screen center”. Artifacts come closer to each other as the camera points towards the sun.
Base
Base + Light Streaks
Base + Light Streaks + Lens Flares
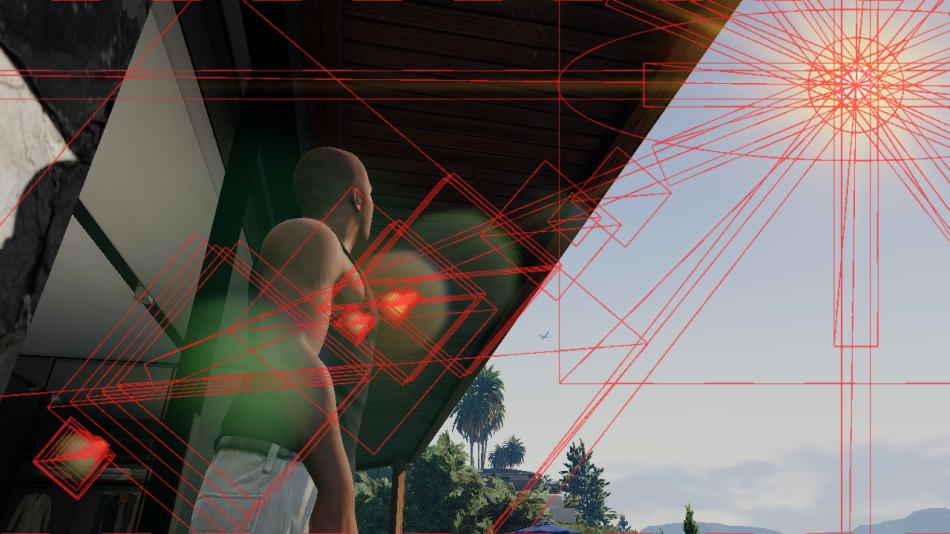
Base + Light Streaks + Lens Flares (Wireframe Highlight)
There are several sprites the engine uses to simulate different lens artifacts:
Base
Base + Flares
Base + Flares (Wireframe)
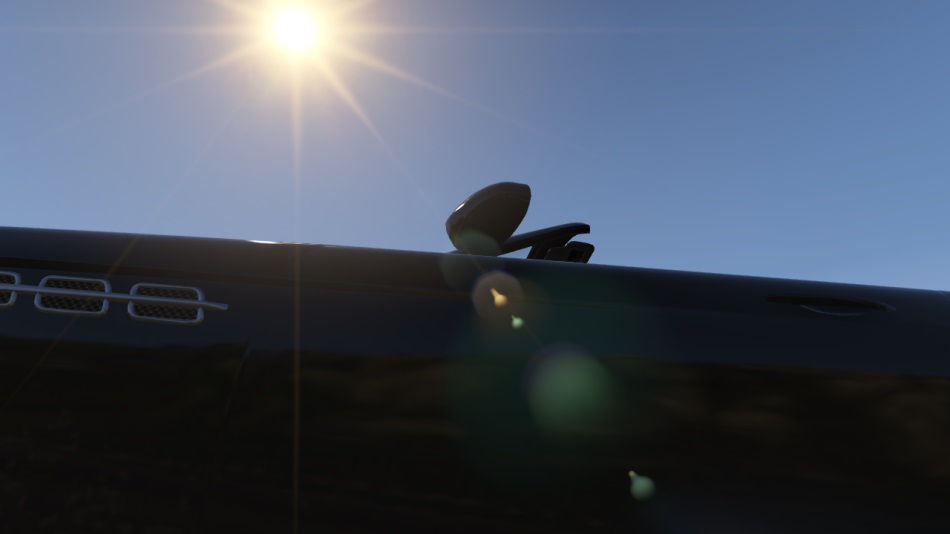
GTA V is all about the attention to details, and lens flares are no exception: their size is proportional to the aperture of the camera. So if you suddenly look towards the sun, the lens flares are big
at first, but then as the aperture narrows to lower the exposure the lens flares become smaller too. The animation below illustrates the phenomenon.
Another nice detail: if you switch to the first-person view, there are barely any lens-flares visible, because we are now seeing through human eyes, not through a camera anymore.
If there’s one domain where Rockstar outperforms the competition, it’s when it comes to LOD.
The world of Los Santos exists in so many different versions with more or less details/polygons, everything being streamed live while you play without a blocking loading screen. And it makes
the whole experience so much more immersive.
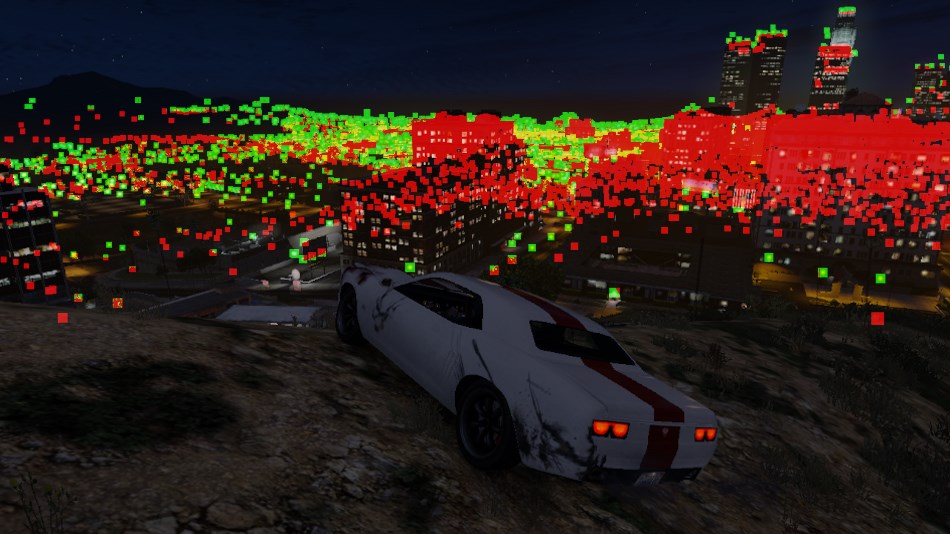
Lights
All the little lights you see in the far distance are real, you can drive towards them and find the bulb that casts the light.
This is what Aaron Garbut, one of the Rockstar North founders and art director,
was declaring shortly before the PS3 release.
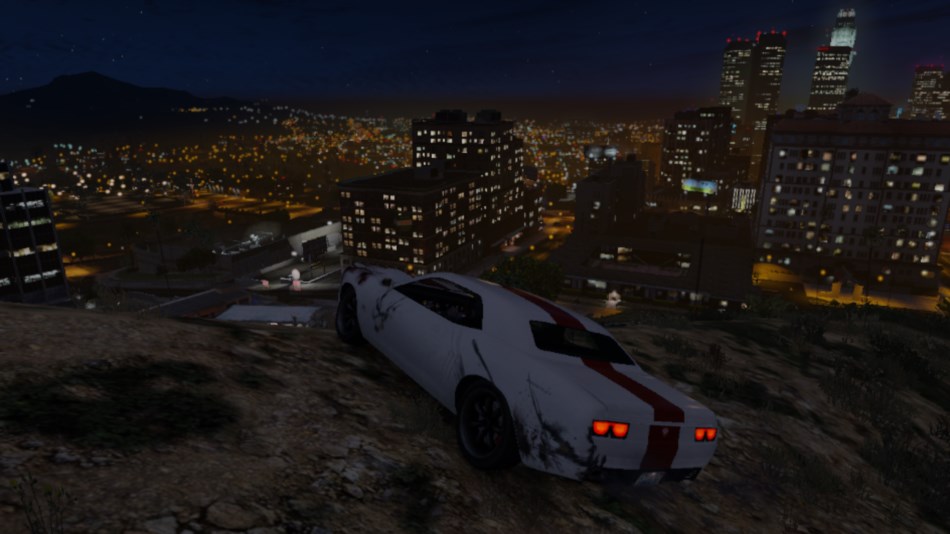
How accurate is his statement? Let’s consider this night scene:
Light Bulbs (Before)
Light Bulbs (After)
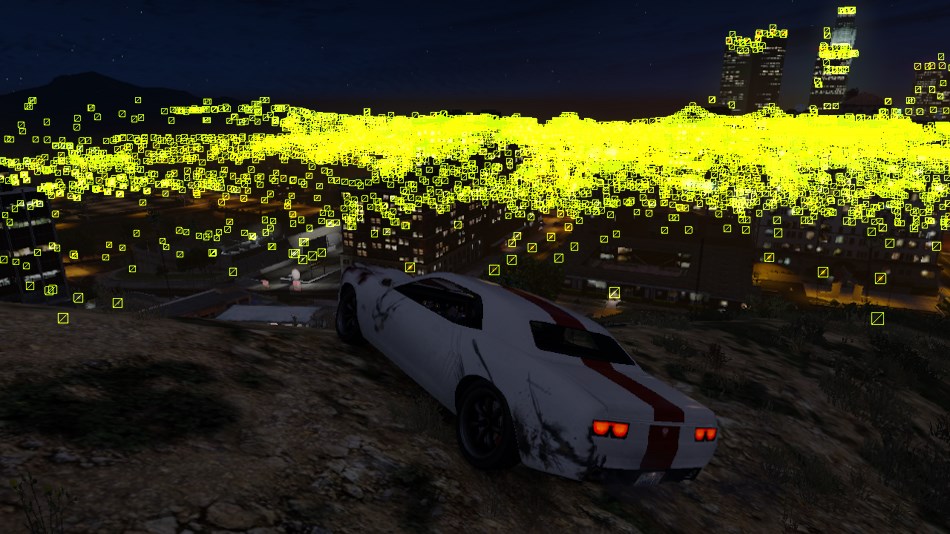
Well it simply is the truth: every single small light spot you can see is a quad rendered with a small 32x32 texture like the one on the right.
They are all heavily batched into instanced geometry but still it represents tens of thousands of polygons pushed to the GPU.
Light Bulbs
Light Bulbs - Wireframe
Light Bulbs - Depth Test Pass/Fail
And these are not just static geometry: the car headlights are also moving along the roads, updated in real-time.
Of course at this distance, no need to render the full car models, only 2 headlights are enough to create the illusion.
But if you decide to go near some distant light, as you come closer, the LOD increases and eventually the full model of the car is drawn.
Low-Poly Meshes
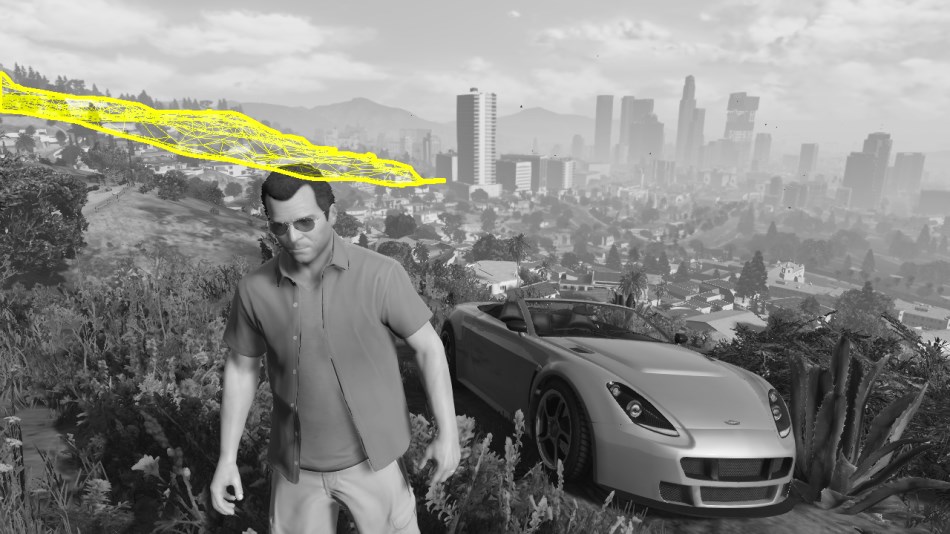
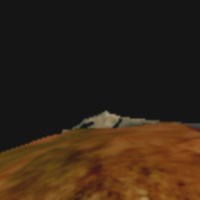
Let’s go back to the frame we dissected previously. Some really vast portions of the world are rendered in a single draw call. For example if we consider
the rendering of the hill below:
Hill rendered in a single draw-call
So what exactly is that tiny hill far away?
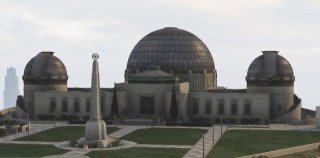
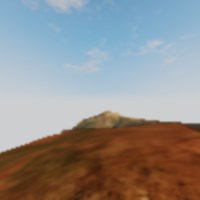
Galileo Observatory
Turns out it’s not small at all, it’s actually Vinewood Hills a big area spanning across several square kilometers, with dozens of houses and buildings.
There’s the Galileo Observatory sitting on the top of the hill, the Sisyphus Theater, Lake Vinewood,
all of these areas which, when you explore them or drive by them, are rendered with thousands of draw-calls and tons of polygons.
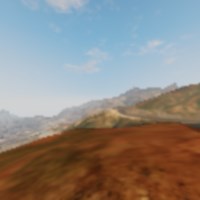
But in our case, this zone is far away, so a low-poly version is rendered: a single draw-call pushing only 2500 triangles.
Low-Poly Model of Vinewood Hills
All the rendering is done with a single mesh reading from a diffuse texture. Even if some tools exist to convert a mesh to a lower-poly version,
they can’t fully automate the process and I wouldn’t be surprised if the 3D artists at Rockstar spent days fine-tuning the meshes manually.
The Grand Theft Auto series has come a long way since
the first opus came out back in 1997.
About 2 years ago, Rockstar released GTA V.
The game was an instant success, selling 11 million units over the first 24 hours and instantly smashing 7 world records.
Having played it on PS3 I was quite impressed by the level of polish and the technical quality of the game.
Nothing kills immersion more than a loading screen: in GTA V you can play for hours, drive hundreds of kilometers into a huge open-world
without a single interruption.
Considering the heavy streaming of assets going on and the specs of the PS3 (256MB RAM and 256MB of video memory) it’s quite amazing the game doesn’t crash after 20 minutes, it’s a real technical prowess.
Here I will be talking about the PC version in DirectX 11 mode, which eats up several GBs of memory from both the RAM and the GPU.
Even if my observations are PC-specific, I believe many can apply to the PS4 and to a certain extent the PS3.
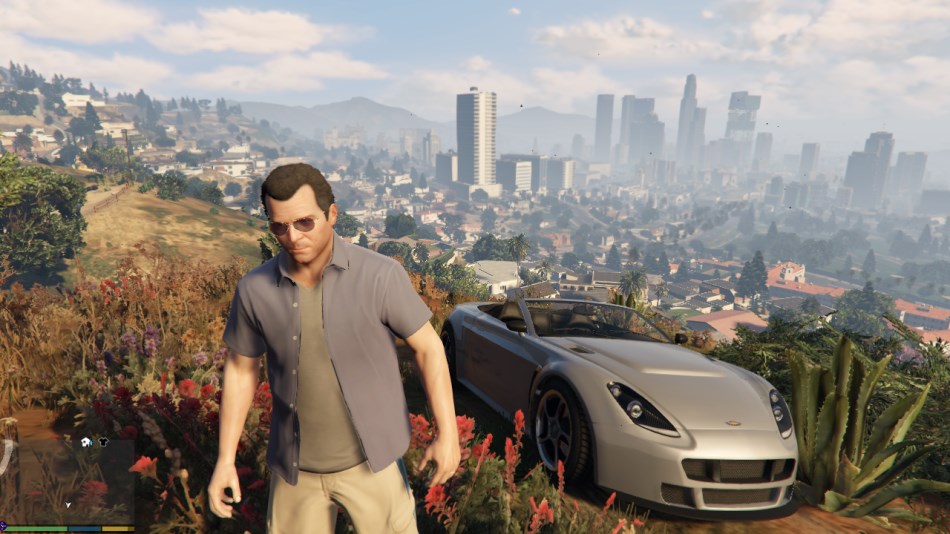
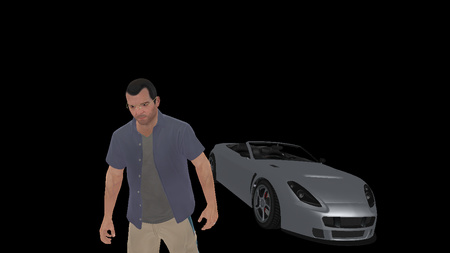
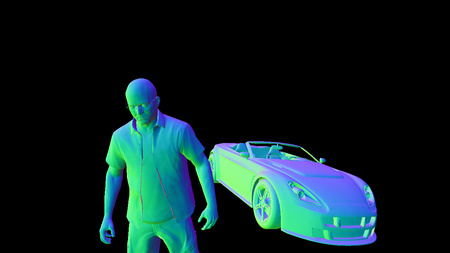
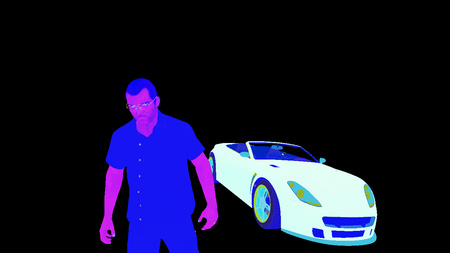
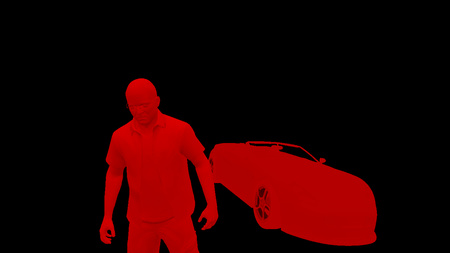
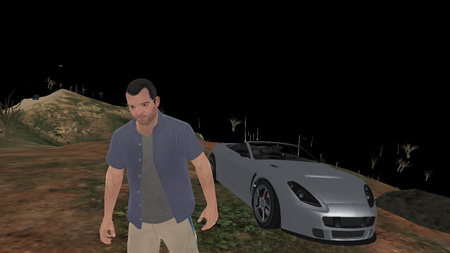
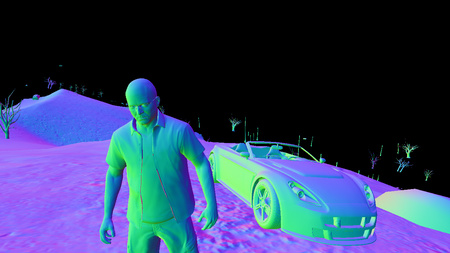
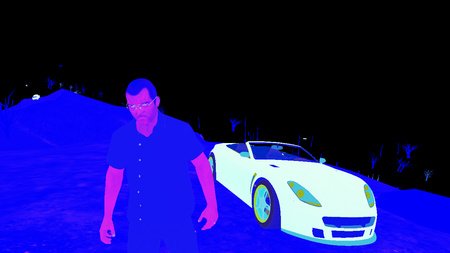
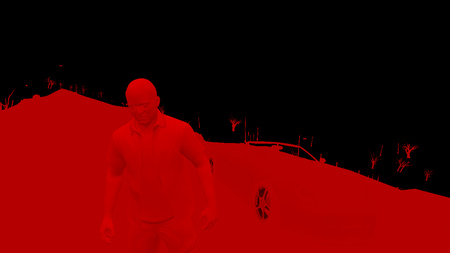
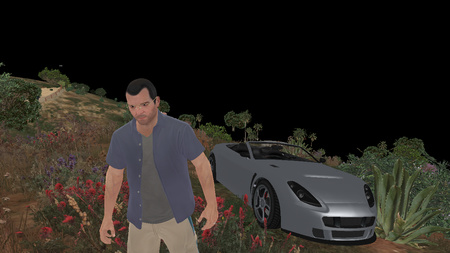
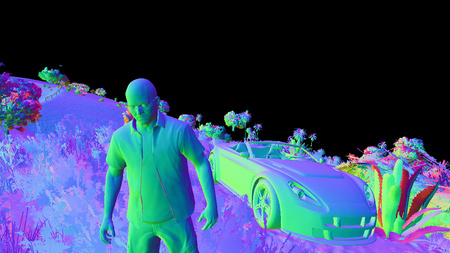
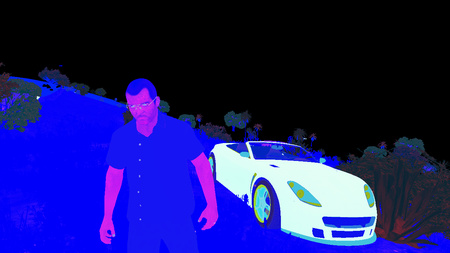
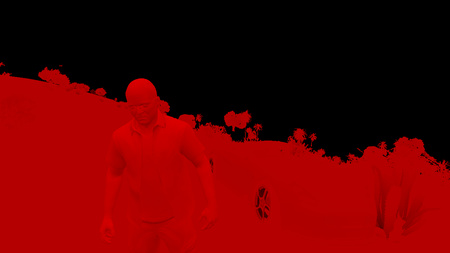
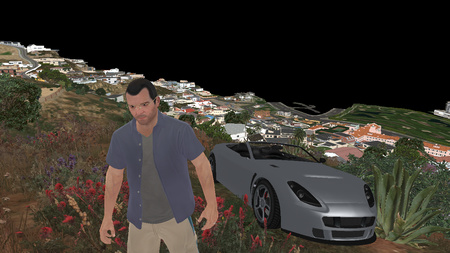
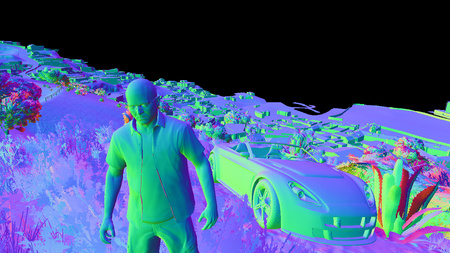
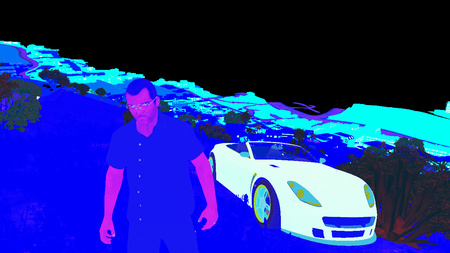
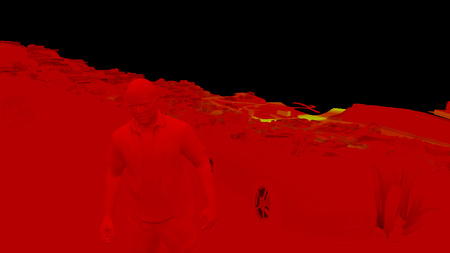
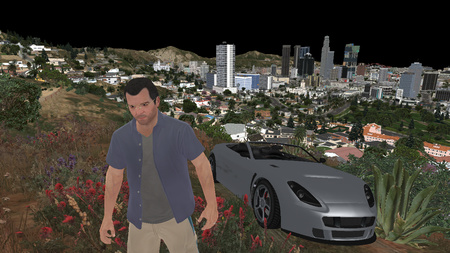
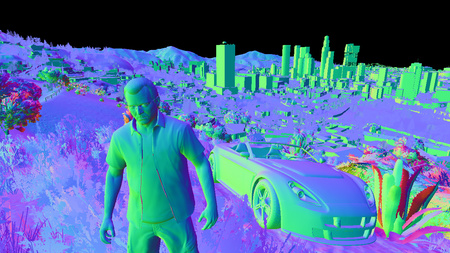
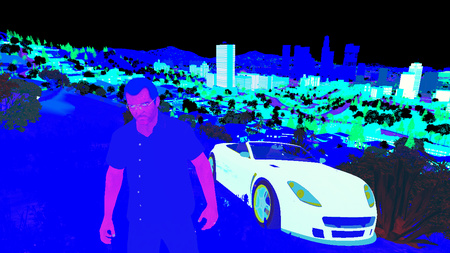
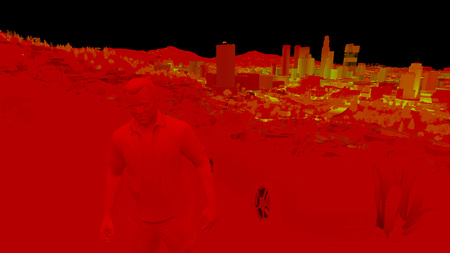
So here is the frame we’ll examine: Michael, in front of his fancy Rapid GT, the beautiful city of Los Santos in the background.
GTA V uses a deferred rendering pipeline, working with many HDR buffers.
These buffers can’t be displayed correctly as-is on a monitor, so I post-processed them with a simple Reinhard operator to bring them back to 8-bit per channel. Update: HDR monitors are common nowadays, this was not the case when this article was written back in 2015.
Environment Cubemap
As a first step, the game renders a cubemap of the environment. This cubemap is generated in realtime at each frame,
its purpose is to help render realistic reflections later. This part is forward-rendered.
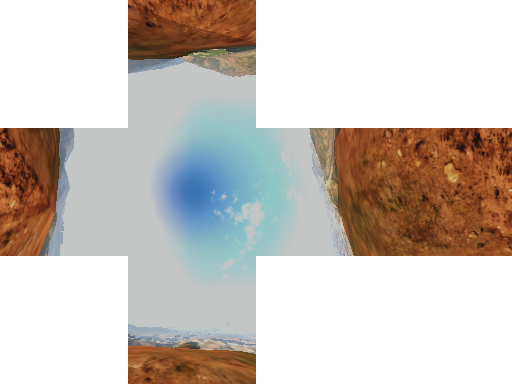
How is such cubemap rendered? For those not familiar with the technique, this is just like you would do in the real world when taking a panoramic picture:
put the camera on a tripod, imagine you’re standing right in the middle of a big cube and shoot at the 6 faces of the cube, one by one, rotating by 90° each time.
This is exactly how the game does: each face is rendered into a 128x128 HDR texture. The first face is rendered like this:
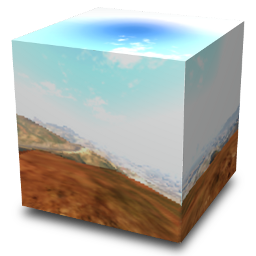
The same process is repeated for the 5 remaining faces, and we finally obtain the cubemap:
Cube seen from the outside
View from inside the cube
(Drag to change view direction)
Each face is rendered with about 30 draw calls, the meshes are very low-poly only the “scenery” is drawn (terrain, sky, certain buildings), characters and cars are not rendered.
This is why in the game your car reflects the environment quite well, but other cars are not reflected, neither are characters.
Cubemap to Dual-Paraboloid Map
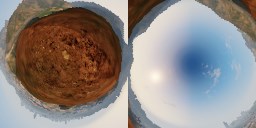
The environment cubemap we obtained is then converted to a dual-paraboloid map.
The cube is just projected into a different space, the projection looks similar to sphere-mapping but with 2 “hemispheres”.
Dual-Paraboloid Map
Why such a conversion? I guess it is (as always) about optimization: with a cubemap the fragment shader can potentially access 6 faces of 128x128 texels, here the dual-paraboloid map brings
it down to 2 “hemispheres” of 128x128.
Even better: since the camera is most of the time on the top of the car, most of the accesses will be done to the top hemisphere.
The dual-paraboloid projection preserves the details of the reflection right
at the top and the bottom, at the expense of the sides. For GTA it’s fine: the car roofs and the hoods are usually facing up, they mainly need the reflection from the top to look good.
Plus, cubemaps can be problematic around their edges: if each face is mip-mapped independently some seams will be noticeable around the borders, and GPUs of older generation
don’t support filtering across faces. A dual-paraboloid map does not suffer from such issues, it can be mip-mapped easily without creating seams.
Update: as pointed-out in the comments below, it seems GTA IV was also relying on dual-paraboloid map, except it was not performed as a post-process from a cubemap: the meshes were distorted directly by a vertex-shader.
Culling and Level of Detail
This step is processed by a compute shader, so I don’t have any illustration for it.
Depending on its distance from the camera, an object will be drawn with a lower or higher-poly mesh, or not drawn at all.
For example, beyond a certain distance the grass or the flowers are never rendered. So this step calculates for each object if it will be rendered and at which LOD.
This is actually where the pipeline differs between a PS3 (lacking compute shader support) and a PC or a PS4: on the PS3 all these calculations would have to be run on the Cell or the SPUs.
G-Buffer Generation
The “main” rendering is happening here. All the visible meshes are drawn one-by-one, but instead of calculating the shading immediately, the draw calls simply output
some shading-related information into different buffers called G-Buffer. GTA V uses MRT
so each draw call can output to 5 render targets at once.
Later, all these buffers are combined to calculate the final shading of each pixel. Hence the name “deferred” in opposition to “forward” for which each draw call calculates the final shading value of a pixel.
For this step, only the opaque objects are drawn, transparent meshes like glass need special treatment in a deferred pipeline and will be treated later.
I gave them my blessing when they asked for my permission a few weeks ago, and I was pleasantly suprised when a print copy of the issue #64 turned up in the mail today.
They handled the conversion to a printable format quite nicely.
You can find the print copy here, otherwise the original article is still online here.
Two years ago, I released Exp3D on Google Play, a fast-paced space shooter I had been working on during my free time.
To celebrate this anniversary, the entire code of Exp3D has now been made freely available on GitHub. Not that I am especially
proud of the code – there are hacks I didn’t have time to clean-up, some parts of the code now look dirty to me and I would rewrite them totally differently – but I received some requests
for open-sourcing the game in the past and I figured it might be interesting for people who want to play with the code.
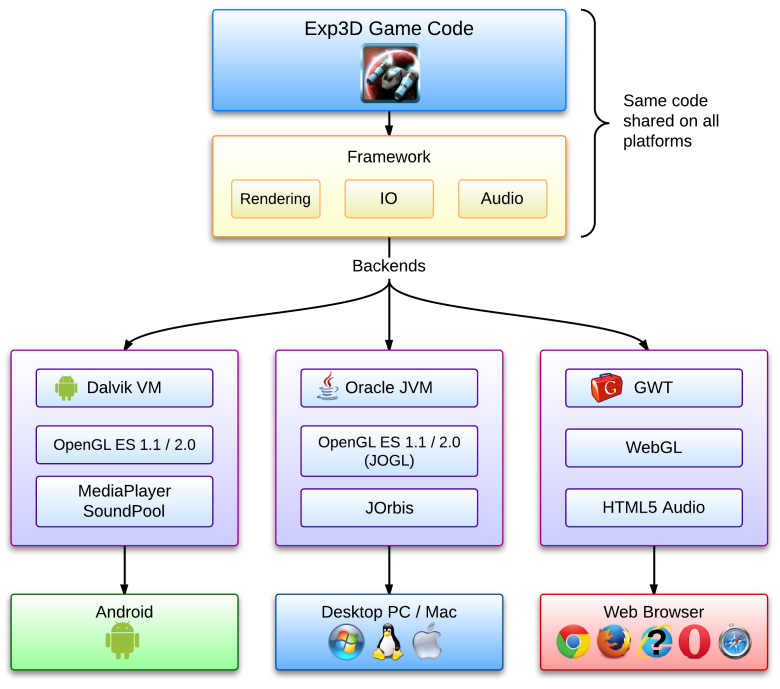
Exp3D is a game written from scratch, initially targeting Android only. Over the development,
desktop support (Windows/Linux/Mac) was added, followed by a WebGL port by transcompiling to pure Javascript.
The game runs on top of a minimalistic multiplatform framework I wrote from scratch.
The source is entirely in Java, there is no “native” code included.
The main loop doesn’t perform any dynamic allocation to maintain a constant 60FPS with 0 GC pauses, this was achieved by relying heavily on object pooling.
95% of the code (25k lines) is written on top of this framework and thus is shared between the different platforms.
The rendering engine can run on either a fixed-pipeline (OpenGL ES 1.1) or a programmable-pipeline (OpenGL ES 2.0, WebGL).
The WebGL version was quite straight-forward to create: I got it working over a week-end using GWT to transcompile the Java codebase into Javascript.
And I am pleased that after 2 years, the WebGL demo finally runs butter smooth on Firefox and Chrome.
The code was never especially heavy, but I used to notice a few frames dropped here and there, which is not happening anymore.